Import a Shadowrocket Subscription and Connect for the First Time
Start with an existing subscription or server details. Follow the order: import → choose a mode → connect → verify → troubleshoot. First confirm that one entry passes a repeatable access test, then adjust additional rules.
Add Server: Add a Server or Use Subscribe
Open Shadowrocket and go to Home. Find Add Server near the SERVER group, or use the add button on the page. First identify what you have: a URL used to update multiple server entries is a subscription; a set of an address, port, protocol, and authentication parameters is information for one server. These are different input methods. In particular, do not paste an entire subscription URL into Host.
If you have an existing subscription link
After opening Add Server, open Type and choose Subscribe. Paste your subscription link into the corresponding URL field. If the interface has a remarks field, enter a name that will help you identify the source, then save. Return to Home and update the subscription. When parsing is complete, check whether actual server entries appear in SERVER. Saving a subscription link and successfully retrieving server entries are separate steps. If you see only a subscription name and no selectable servers, do not proceed to connect.
Before pasting, check the beginning and end of the link to make sure it does not include spaces, line breaks, chat instructions, or punctuation. Parameters in the link are usually authentication details; do not change them without a reason or share them publicly. If an update shows an error or returns an empty list, keep the original link and check the error message rather than adding the same subscription repeatedly. Ask your existing service provider about expiration or access restrictions; these are not determined by installing or purchasing the app.
If you have details for one server
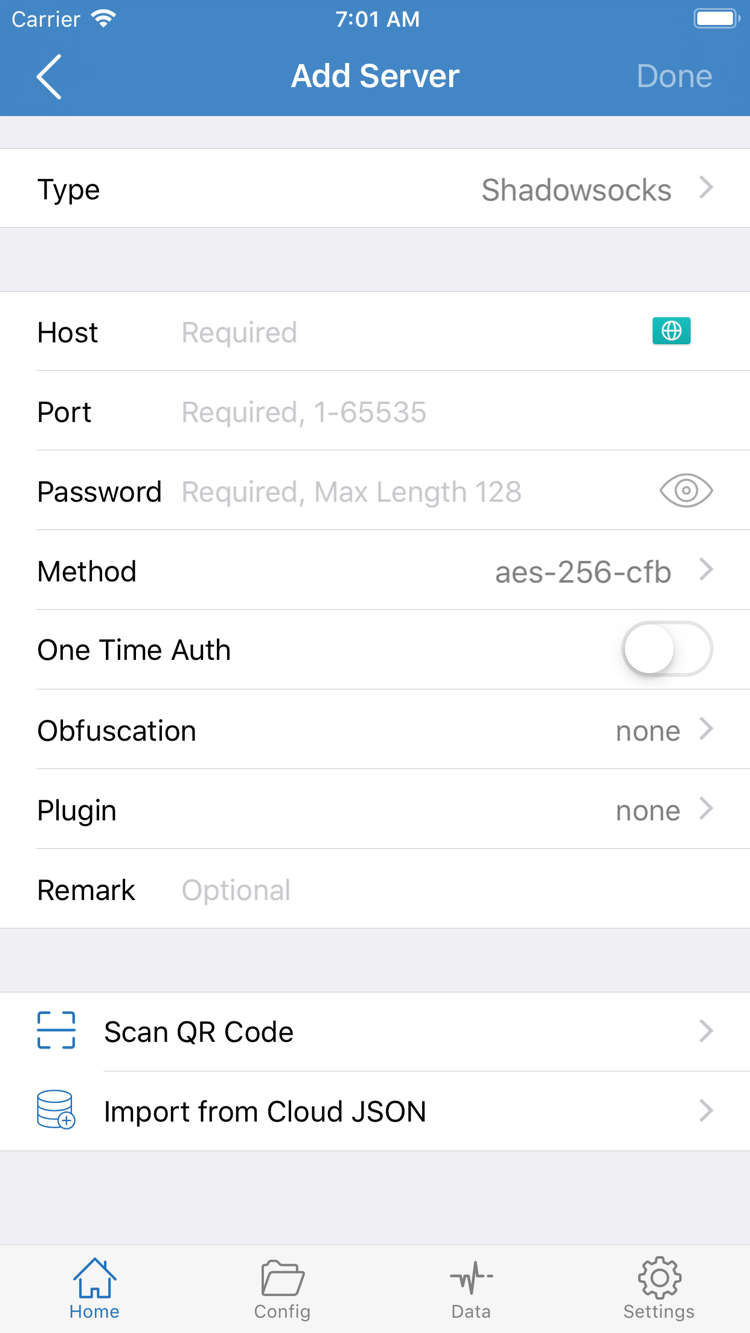
Choose the actual protocol in Type, then enter Host, Port, and the authentication fields required by that protocol, matching the original information. For example, Shadowsocks requires checking Password and Method. Other protocols may have different fields, so do not copy a field combination from a screenshot. Host is usually the server’s domain name or IP address; enter the port as a number. Keep passwords and other authentication values unchanged, including their letter case.
If you have a QR code that can be imported, use Scan QR Code. Import from Cloud JSON is for the corresponding JSON data source; it is not a general replacement for any subscription link. After importing, open the entry and check that its protocol and address match your existing details. Save and return to Home. Confirm that a selectable entry appears in the SERVER group before choosing Global Routing. See the terminology guide for protocol field differences. You do not need to change advanced parameters you do not yet understand.
Global Routing: Choose One of Three Modes
After importing a server, do not turn on the connection switch just yet. Open Global Routing on Home and check whether the current mode is Config, Proxy, or Direct. The server entry answers “which server to use”; Global Routing answers “how requests are handled.” Selecting a server but choosing the wrong global mode can still lead to unexpected access results.
- Config: Rules in the current configuration determine whether requests use PROXY, DIRECT, or REJECT. This mode suits everyday rule-based routing, provided the correct configuration is selected and its rules match the intended destination.
- Proxy: Handles requests in global proxy mode. It can help with short-term troubleshooting by distinguishing server issues from Config rule issues. It does not automatically create rules for individual websites.
- Direct: Handles requests in direct mode and should not be used to prove that a proxy server is working. You can use it temporarily to compare access over your original network, then restore the intended mode after testing.
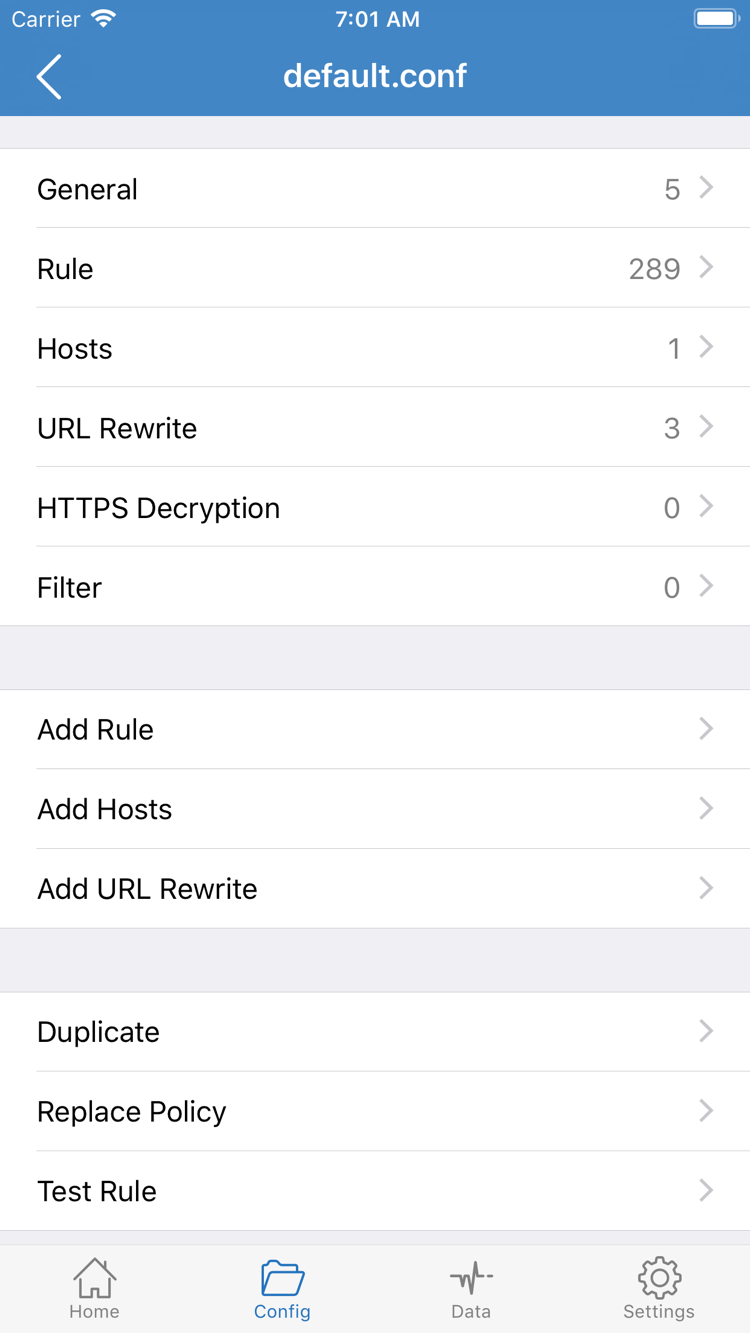
To use Config, open the Config page at the bottom and confirm that the expected configuration is selected. A server subscription and a configuration file are different things: the former mainly manages connectable entries, while the latter contains rules and other settings. Updating a subscription may add server entries, but it does not mean that the routing rules in Config have also been updated. Open the configuration editor to see sections such as General, Rule, Hosts, and URL Rewrite. For a first setup, check the actual Rule contents; you do not need to edit multiple sections at once.
The snippet below illustrates rule order; new users do not need to replace their existing configuration right away. It sends example.com and its subdomains through PROXY, then routes other requests to DIRECT. The example domain is for demonstrating syntax only, not an actual test destination. Replace it with your own destination before using a rule, and keep a copy of the original configuration.
[Rule]
DOMAIN-SUFFIX,example.com,PROXY
FINAL,DIRECT
Rules are generally matched from top to bottom. FINAL belongs in the fallback position; if it matches too early, rules below it will not handle the request. To add a rule, use Add Rule and check its order after saving. For details on rule types, policies, and priority, see the rules and configuration reference. Once the mode and configuration are confirmed, return to Home and connect in the next step. This keeps configuration edits separate from connection troubleshooting.
Home: Connect and Complete System Authorization
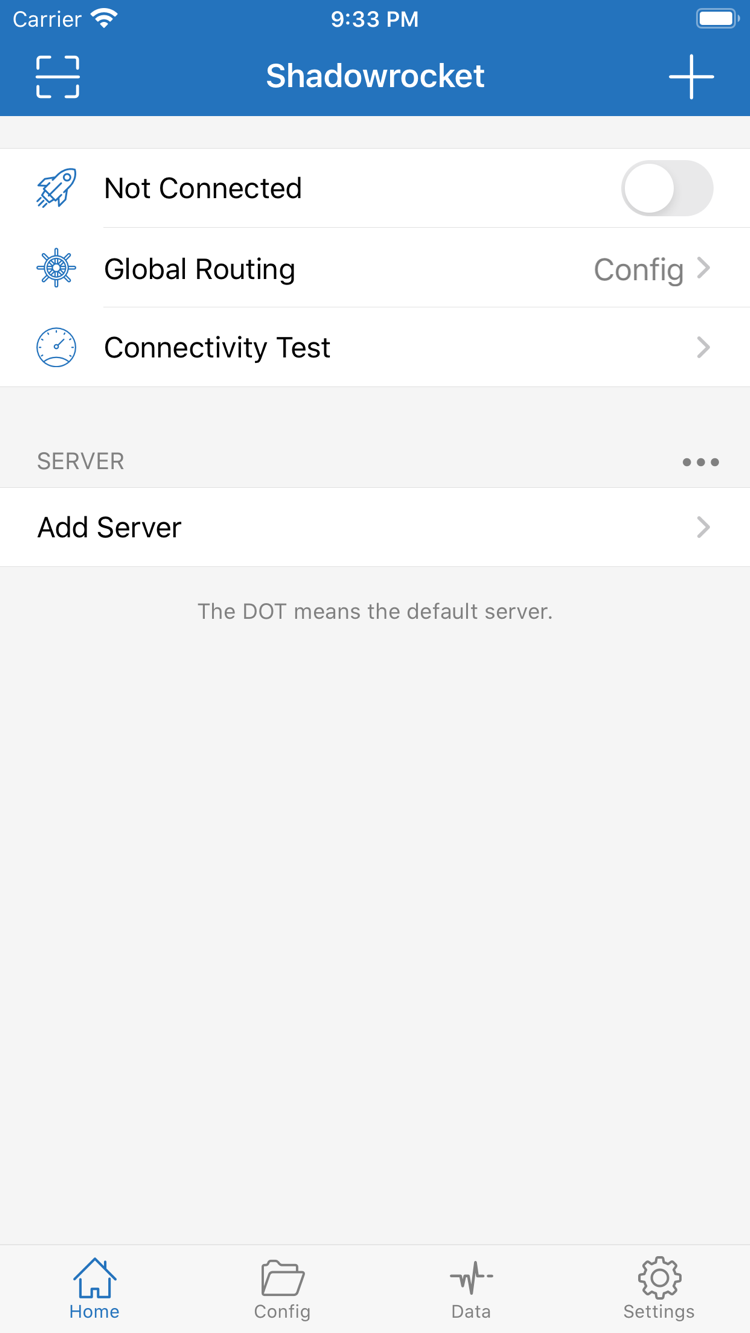
Return to Home and select the server you want to use in the SERVER group. Confirm that the selection indicator is on the intended entry. If several entries have similar names, open one to check Host and Port, then return and select it. Test one server at a time. Avoid switching entries repeatedly while the connection switch is on, or it may be difficult to tell which set of parameters was in use when a failure occurred.
Check that Global Routing shows the mode you just selected, then turn on the connection switch near Not Connected at the top. On first connection, iPhone / iPad will ask for permission to add a VPN configuration. Confirm that the request comes from Shadowrocket, follow the system prompt to allow it, and complete authentication with your device passcode or biometrics. If you cancel the request, the app will not have the required authorization. Return to Home and try connecting again instead of reimporting all your servers.
After authorization, return to the app and check whether the status at the top changes and the switch stays on. Whether a VPN indicator appears in the system status area depends on the device and current screen, so do not rely on the indicator alone. An established connection only means that the system-level connection process has progressed; it does not verify that the destination website, DNS, and routing rules are all working. You still need to test and access a destination.
If the switch turns off immediately, note any system prompt or app error message. Check whether another VPN configuration or management policy is active on the device, as multiple connection settings can interfere with each other. Follow your organization’s requirements on managed devices; do not remove managed configurations without permission. Stop other connections you can manage, then try again. If authorization is complete but the connection continues to fail, troubleshoot by failure stage in the final step.
To stop, return to Home and turn off the switch at the top. For an initial check, try the full sequence once: turn it off → confirm the status → turn it on again. This reapplies the current configuration. Do not tap the switch repeatedly in quick succession. Once the connection status is stable, keep the current server and Global Routing selection and continue to verification. This gives each test a clear starting point.
Connectivity Test: Check That It Works
With the connection switch on, run Connectivity Test on Home. The result describes performance for the test method and destination used; it does not mean that every website is accessible. If the test gets a response but the intended destination will not open, check the destination and rules. If the test fails but the destination is accessible, check Test Method in Settings rather than immediately concluding that the server is unavailable.
- Check your original network first. When practical, turn off the connection and open a page that normally works to confirm that Wi-Fi or cellular data is available. If the original network is already having problems, restore the basic connection before repeating the app test.
- Then check the proxy path. Connect in Shadowrocket and visit a known-working destination that is expected to use PROXY. Choose the test destination yourself; do not treat example.com from the rule example as proof that the proxy works.
- Finally, check the rules. If using Config, compare the destination domain, matched policy, and actual access result with the connection records available in the app. A page opening does not necessarily mean it used PROXY; DIRECT may have handled the request successfully.
To distinguish server problems from rule problems, keep the same server and temporarily change Global Routing from Config to Proxy, then visit the same destination again. If Proxy works but Config does not, first check the selected configuration, domain rules, and FINAL. If both fail, first check server parameters, authentication details, the current network, and server status. This comparison helps narrow down the issue; it is not a recommendation to keep using Proxy.
Change one variable at a time: if you change the mode, do not also change the server, DNS, and test network. Use the same destination and steps before and after the change. If needed, reopen the page or app to reduce the effect of existing connections and cached data. Restore your intended mode after testing. If you want rule-based routing, return to Config and confirm that requests intended for direct access and proxy access are handled as expected.
Settings: Troubleshoot by Failure Point
No selectable server appears after import
Return to the subscription entry. Confirm that Type is set to Subscribe, the URL was copied in full, and an update has been run. If the list is empty, check whether the response is a sign-in page, error page, or data format the app cannot use, rather than repeatedly tapping Save. Expiration, access restrictions, or a changed link on the existing service provider’s side can also affect the update result. Keep the original settings before importing again; duplicate entries make later selection and troubleshooting harder.
The server is listed, but the switch will not stay on
First confirm that system authorization is complete, then check that the selected server is the entry you just configured. For manually entered details, compare each value with the original information, especially Port, authentication values, Method, and any TLS or other fields required by the protocol. Do not replace missing parameters with values that merely look similar. For an imported subscription entry, try updating it first, then check the server status with your existing service provider.
The connection is on, but some destinations fail
Check Global Routing and the current Config first, then see whether an earlier rule routes the destination to DIRECT or REJECT. If domain resolution fails, check the DNS settings in use and the network environment rather than replacing the entire configuration. Website sign-in, destination service maintenance, app cache, and existing connections can also affect results. Record differences between the same destination in a browser and other apps separately; one successful or failed request does not describe every request.
Use Settings to help identify the issue
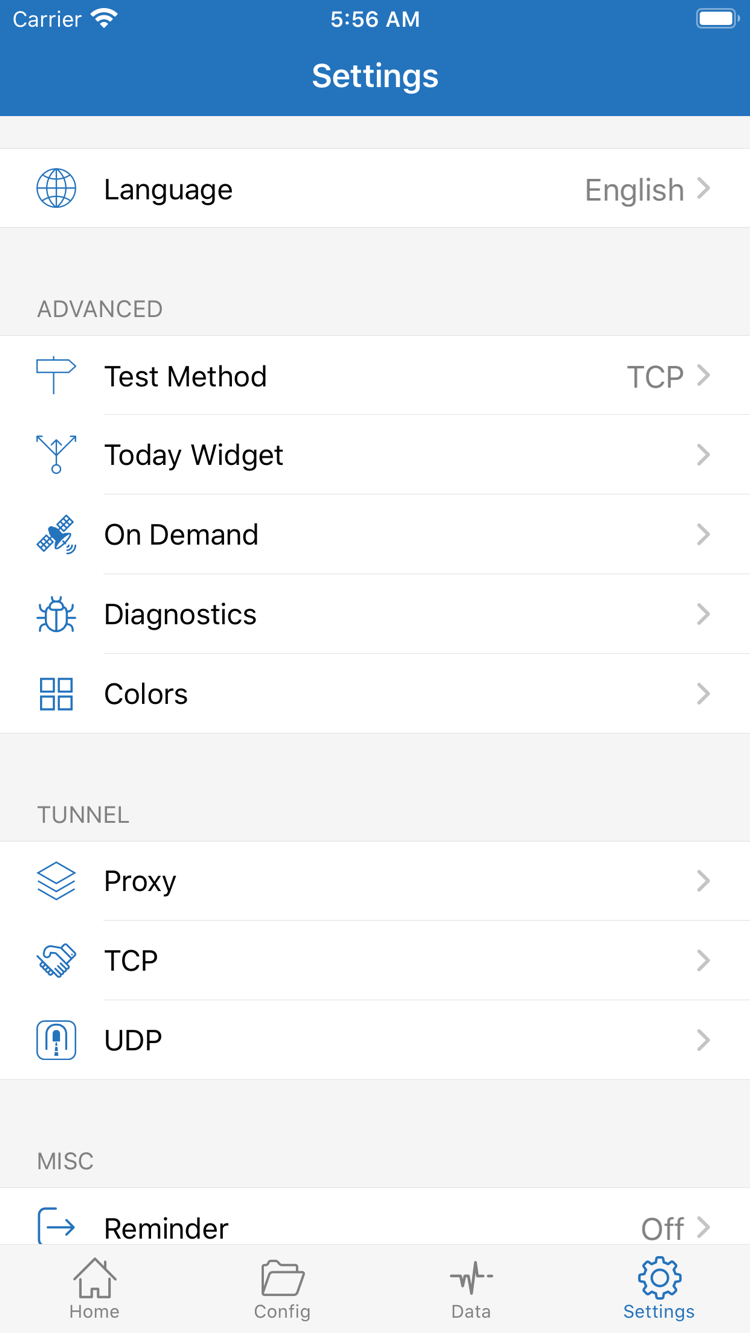
Open Settings at the bottom. First check whether Test Method matches your current test, then use Diagnostics as needed to collect error details. On Demand sets conditions for triggering a connection; it does not fix subscription or authentication errors. For initial verification, connect and disconnect manually. Configure automatic connection conditions only after confirming that the basic connection path works.
Settings also includes options related to Proxy, TCP, and UDP. Do not change these settings one by one just because a destination will not open. Record the original values, change only the setting directly related to the observed issue, and restore it if there is no improvement. When describing the issue to your existing service provider, include the network type, Global Routing mode, error text, and reproduction steps. Remove subscription URLs, passwords, authentication parameters, and other private information before sharing screenshots or Diagnostics results.
If the issue persists, classify it as an import failure, connection failure, or access failure after connecting, then read the FAQ troubleshooting guide. For further changes involving rule matching, DNS, or configuration fields, see the configuration field reference. Identifying the stage where the failure occurs is more useful than resetting every setting at once.
Reference Guides After Connecting
Once the basic connection is verified, adjust rules and automatic connection conditions as needed. After updating a subscription, confirm that the selected server is still available and keep a copy of a working configuration.